|
|
Set Up Your Pool
Leave your pool's filter and heater operating normally. Do not use your pool or spa during test period. Turn off all automatic-filling systems. Turn off all water features such as waterfalls, fountains, spa spillways or spray heads that produce excessive evaporation. Fill your pool to its normal operating level. Over filling the pool may give an indication of a false leak.
|
|
|
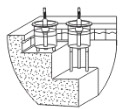
Select Location
Check A Leak is designed to work on the first or second step of your pool. If the water depth at the top step is over 4" you can place the Check A Leak on the top step without the legs. If the water depth at the top step is under 4" you must attach the legs and place the Check A Leak on the second step.
|
|
|
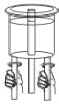
Attach Legs If Needed
Place short legs over the leg post. Twist legs to lock in place. Add leg extensions if needed.
|
|
|
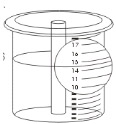
Add Water
Fill Check A Leak with water to 1 1/2" below the top of the center tube. (Between 14 & 16 on the outside gauge)
|
|
|
|
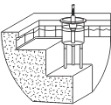
Place Unit
Place unit on the top or second step. When using the second step. Adjust the leg height so that the level inside the unit 1" above the pool water level. This will give Check A Leak weight and stability.
|
|
|
Place Unit
Insert the Leak Gauge into the center tube then place the blue float over the Leak Gauge and center tube. Make sure both floats are floating freely.
|
|

|
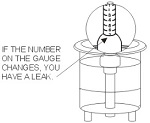
Record the First Reading
Check A Leak is designed to respond slowly to changes in conditions. You must wait at least 15 minutes for the floats to stabilize before recording the starting reading.
|
|
|
Record the Second Reading
24 hours later take a second reading and record any change.
|